The ideal modern-retro video game console
My goal is to build a video game console for (my) kids. I want to teach them programming in a fun way: fun for them… and also fun for me. The video-game console features are:
- Modern components, with a retro “spirit”.
- Easy to program, a must.
- Chosen: Python, in particular CircuitPython
- Gamepad support: Multiple gamepads at the same time (multiplayer is a must).
- Chosen: Bluepad32 firmware since it supports all modern Bluetooth gamepads ( see my previous post)
- “Retro” sound:
- Chosen: SN76489 (more info down below)
- “Retro” screen:
- Chosen: 64x32 LED matrix. Let’s see what we can do in this extremely low-resolution screen.
- A powerful enough micro-controller:
- Chosen: Matrix Portal M4, mostly for convenience since it comes with an ARM Cortex M4, ESP32, “expansion port” + header to connect to the matrix LED. It already supports CircuitPython. As a bonus it has an accelerometer.
- Portability: It should be portable, no need to use an external power supply.
In other words, I’m building a Nintendo Switch killer. What will happen next is that Nintendo will run out of business. If this happens, my 7-year-old kid will kill me, since his dream is to be a video game designer at Nintendo… so probably I shouldn’t be that aggressive in my marketing campaign.
Adding music support: the SN76489 chip

The SN76489 is a “chiptune” music chip that was used in many video game consoles and computers back in the 80’s. It is the ideal candidate for the “modern retro console” because:
- It is easy to get one: Ebay, Aliexpress
- It is cheap: ~$1
- It is easy to program
- Songs don’t take that much space
- 3 “square” channels + 1 noise
The MatrixPortal M4 “expansion” bus
MatrixPortal M4 has 11 lines that can be used to expand (and debug) the board. In our case, we are going to use the A1-A4 lines to control the SN76489 chip.

According to the schematic, these 4 lines (A1-A4) are SERCOM lines, meaning that they can be used for SPI among other things. And in the SAMD51 datasheet, we can see that A1 (real name is PA05) can be used as clock, and A2 (real name is PA04) as MOSI ( not every combination is valid).
We are going to use SPI to drive a 74HC595, which is a serial-to-parallel chip. And the 74HC595 will connect to the SN76489. This is the schematic:
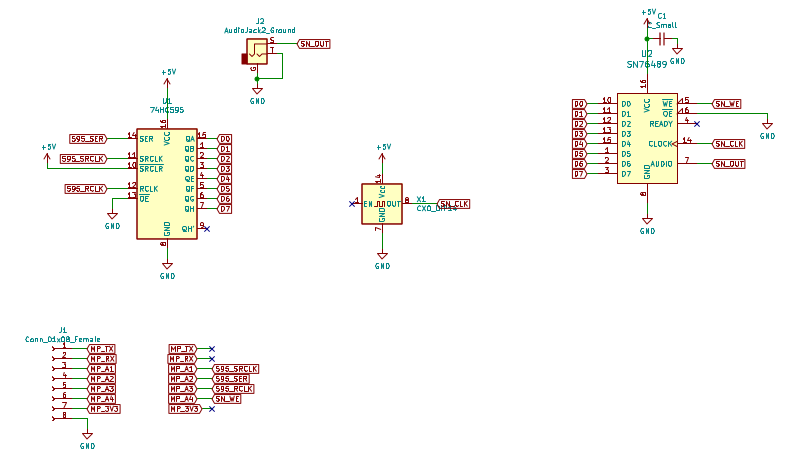
The most important to keep in mind is how the Matrix Portal is connected to the 74HC595:
- A1 <–> SRCLK in 74HC595
- A2 <–> SER (MOSI) in 74HC595
- A3 <–> RCLK in 74HC595
- A4 <–> /WE in SN76489

The rest is very similar to other existing schematics. E.g: this one from Aidan Lawrence:
BOM:
- 1 x SN76489
- 1 x 74HC595
- 1 x 3.579545MHz oscillator
- 1 x LM386 audio amplifier module
- 1 x 3-watt, 8-ohm speaker
I chose a 3.579545Mhz oscillator to be compatible with IBM PC Jr / Tandy 1000. But you can choose any oscillator up to 4.0 Mhz.
SN76489 pinout
If you have never used a SN76489 before, then pay special attention to the pinout!
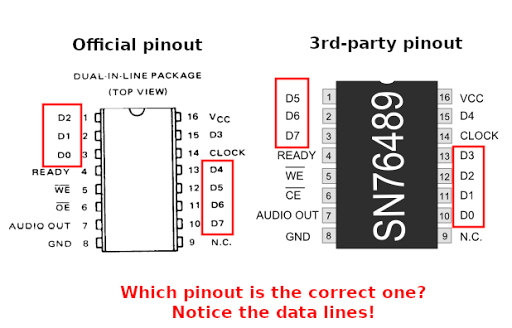
The answer is: both. The left one is using the lines in MSB (WTF Texas Instruments!) and the right one is in LSB. If that is confusing, then just use the one from the right!
Since I did the wiring in the wrong order (I used the left pinout without knowing it was in MSB order) and was too lazy to re-wire it, I “fixed” it in software by converting MSB <–> LSB while writing the data to the 74HC595:
Notice that I’ll remove the hack in the future, once the wiring is fixed.
Playing music from CircuitPython
The good thing about using SPI, is that we can do everything from Python, without resorting to C. CircuitPython already has a library to drive the 74HC595, so it was pretty easy to support it.
I wrote a simple python library to play VGM music files.
And they way to use it is very simple:
import music76489

m = music76489.Music76489()
m.load_song('my_song.vgm')
while True:
  # This is your game main loop
  m.play()
The complete source code of the game that appears in the video is here:
Creating your own song
For the time being, the music library plays VGM sound files (more coming, see down below).
VGM files can be created with different “trackers”. I recommend using the Deflemask tracker since it is free and multiplatform.
https://www.deflemask.com/deflemask_full_7.png
Whereas writing a Deflemask tutorial is outside the scope of this project, you should basically target the SN76489 chip (Sega Master System) at 3.579545Mhz ( NTSC) if you want to give it a try.
More information about VGM here:
What’s next
- Polish the code: remove hacks, cleaner, faster, more documentation, more examples.
- Add support to play music notes, sound effects. Similar to
the Commodore 128 BASIC
playandsoundcommands. - Support PVM file format ( less RAM, less disk space).
- Design PCB / Shield for the Matrix Portal M4.
- Design 3D “enclosure” to attach to the speaker.
- Attach a battery.
- Create more games…
- …in sum, a real Nintendo Switch killer! :)