Bluepad32 for Arduino + ESP32
Supported boards
Bluepad32 runs on any ESP32, ESP32-S3, ESP32-C3, ESP32-C5, ESP32-C6, or ESP32-H2 module that supports the Arduino Core for ESP32.
Bug
If you see no serial output on ESP32-S3 boards such as the Arduino Nano ESP32 or Lolin S3 Mini, read GitHub issue #65 to enable USB CDC output.
Choose one of two methods to configure a Bluepad32 Arduino project:
- Option A: Use Arduino IDE (recommended for Arduino IDE users)
- Option B: Use ESP-IDF with the template project (recommended for advanced configuration and console access)
Option A: Use the "Arduino Core for ESP32 + Bluepad32" board
Recommended for Arduino IDE users.
Complete these 4 steps:
- Add the ESP32 and Bluepad32 board packages to Boards Manager.
- Install the ESP32 and Bluepad32 board packages.
- Select an
ESP32 + Bluepad32board. - Open and upload the
Bluepad32example sketch.
1. Add the ESP32 and Bluepad32 board packages to Boards Manager
Add these two board index URLs to Arduino IDE:

- Official ESP32 package:
https://raw.githubusercontent.com/espressif/arduino-esp32/gh-pages/package_esp32_index.json - Bluepad32 + ESP32 package:
https://raw.githubusercontent.com/ricardoquesada/esp32-arduino-lib-builder/master/bluepad32_files/package_esp32_bluepad32_index.json
For instructions on adding board URLs, read Add or remove third-party boards in Boards Manager.
2. Install the ESP32 and Bluepad32 board packages
After you add both board URLs, install the packages:
- Open
Tools->Board->Boards Manager. - Install the
esp32board package. - Install the
esp32_bluepad32board package.

3. Select an "ESP32 + Bluepad32" board
Select your target board from the menu:
- Open
Tools->Board->ESP32 + Bluepad32 Arduinoand select your board.

4. Open and upload the "Bluepad32" example

Open the Bluepad32 Controller example sketch:
- Open
File->Examples->Bluepad32_ESP32->Controller.
Compile and upload the sketch to your board.
Option B: Use ESP-IDF with the template project
Note
Recommended for advanced users.
Clone the template project
git clone --recursive https://github.com/ricardoquesada/esp-idf-arduino-bluepad32-template.git my_project
Choose one of two ways to build with ESP-IDF:
- Option A: Use PlatformIO
- Option B: Install the ESP-IDF toolchain manually
A) Use PlatformIO with ESP-IDF

- Open Visual Studio Code and select the PlatformIO extension.
- Click Pick a folder and select the
my_projectfolder.
PlatformIO automatically downloads the ESP-IDF toolchain and all required dependencies.
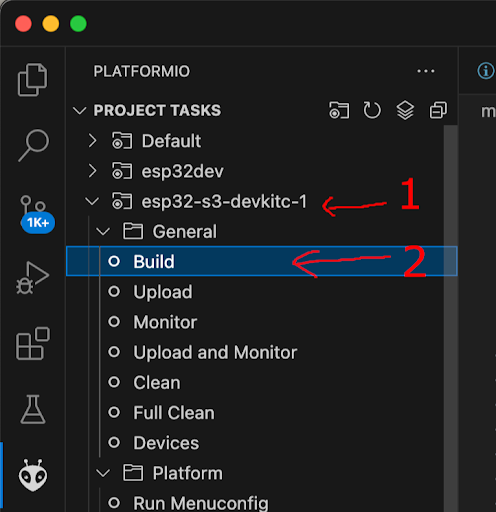
After PlatformIO installs all dependencies, build the project:
- Select a preconfigured board target (such as
esp32-s3-devkit-1), or add your board inplatformio.ini. - Click Build.

Click Upload and Monitor:
- PlatformIO flashes the firmware to your board.
- PlatformIO opens the serial console. Type
helpin the console to list available commands.
B) Install ESP-IDF manually
Follow the official ESP-IDF setup guide for your operating system:
Compile and flash the template project
Run these commands to build and flash the project:
# Open your project folder
cd my_project

# Compile the project
idf.py build

# Flash the binary and open the serial monitor
idf.py flash monitor
Run menuconfig to customize project components:
# Configure components
idf.py menuconfig
Further reading
See the template repository for complete documentation: https://github.com/ricardoquesada/esp-idf-arduino-bluepad32-template