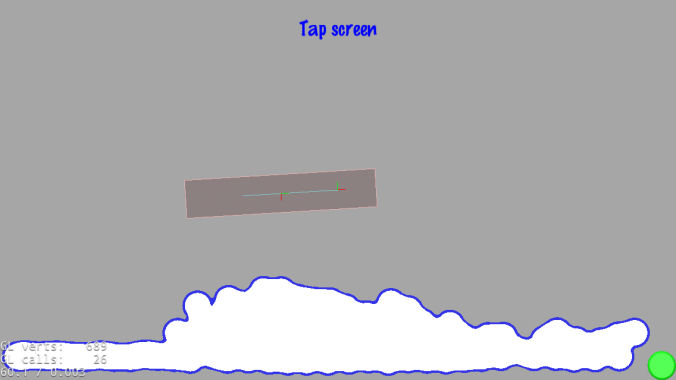
In Part I I described to how integrated LiquidFun with Cocos2d-x. In this part (part II) I’ll describe how to render the particles using a basic water effect.

Part I uses just one glDrawArrays(GL_POINTS, 0, total); to draw the particles. And although that works to draw “particles”, it is not enough to draw “water”.
Drawing “water” requires a more complex rendering algorithm, like the one used in this example. And implementing an algorithm similar that one is what this article describes.
The algorithm works more or less like this:
- Choose a white circle and blur it.
- You can blur the circle at runtime
- Or you can blur it off-line.
- Create an a new frame-buffer (think of a clean off-screen buffer where you can render whatever you want)
- Render the particles into the newly created frame-buffer using the blurred circle
- Now render the frame-buffer into the main color-buffer using a threshold. The threshold could be something like this:
- If pixel.r < 0.1, discard the pixel (the pixel won’t be drawn)
- If pixel.r < 0.2, draw a blue pixel (for the border, although this is optional)
- else draw a white pixel (the inner part of the water)
How to do it using Cocos2d-x and LiquidFun
Let’s take the LFParticleSystemNode from Part I, and “evolve” it:
The first thing to do is to add the “off-screen” frame-buffer into the LFParticleSystemNode class. In Cocos2d-x, the “off-screen” buffers are created with the RenderTexture class. Example:
[code language=“cpp”] bool LFParticleSystemNode::init(b2ParticleSystem* particleSystem, float ratio) { … // create an off-screen frame-buffer with the size of the screen auto s = Director::getInstance()->getWinSize(); _renderTexture = cocos2d::RenderTexture::create(s.width, s.height, Texture2D::PixelFormat::RGBA8888); this->addChild(_renderTexture); _renderTexture->setAnchorPoint(Point::ANCHOR_MIDDLE); _renderTexture->setPosition(Point(s.width/2, s.height/2));
// Change the default shader. Use a the threshold shader auto program = GLProgram::createWithByteArrays(_renderTextureShaderVert, _renderTextureShaderFrag); auto programState = GLProgramState::getOrCreateWithGLProgram(program); programState->setUniformFloat(“u_threshold_discard”, 0.15); programState->setUniformFloat(“u_threshold_border”, 0.3);
… } [/code]
And, as mentioned earlier, the RenderTexture (the off-screen frame-buffer) needs a shader with a threshold. The threshold shader should look like the following:
[code language=“cpp”] varying vec4 v_fragmentColor; varying vec2 v_texCoord; uniform float u_threshold_discard; uniform float u_threshold_border;
void main() { vec4 color = v_fragmentColor * texture2D(CC_Texture0, v_texCoord); if( color.r < u_threshold_discard) // black or discard color = vec4(0,0,0,0); else if( color.r < u_threshold_border) // blue for the border color = vec4(0.2,0.2,0.9,1); else // white for the center color = vec4(1,1,1,1); gl_FragColor = color; } [/code]
The values u_threshold_discard, and u_threshold_border are defined at runtime. In the example, they are set at 0.15 and 0.3 respectively.
The next thing to do is, to render the particles in the RenderTexture.
[code language=“cpp”]void LFParticleSystemNode::draw(Renderer *renderer, const Mat4 &transform, uint32_t transformFlags) { // tell RenderTexture to “capture” the particles _renderTexture->beginWithClear(0,0,0,0);
_customCommand.init(_globalZOrder); _customCommand.func = CC_CALLBACK_0(LFParticleSystemNode::onDraw, this, transform, transformFlags); renderer->addCommand(&_customCommand);
// tell RenderTexture to stop “capturing” the particles _renderTexture->end(); } [/code]
The result is the following

Further improvements
What I described is just a simple algorithm to render water. But more advanced (and better looking) algorithms could be implemented using the same principle:
- Render blurred (or any other effect) particles into an off-screen buffer
- Render the off-screen buffer with an special shader
As an example, the official “LiquidFun - EyeCandy” sample from Google uses a much more complex shader that involves lighting, refraction, and distortion in the background.
Customizing shaders in Cocos2d-x v3.1+
Cocos2d-x v3.1 introduced a new way to customize shaders. The same GLProgram works like in v3.0, but if you want to add custom attributes or uniforms, instead of subclassing GLProgram, you can can do it by using the GLProgramState class. Subclassing GLProgram still works, but the recommend way is to use GLProgramState. It works like this:
[code language=“cpp”] // you create a GLProgram like in v3.0 GLProgram* glprogram = GLProgram::createWithByteArrays(_particleShaderVert, _particleShaderFrag);
// and then you create a GLProgramState with it GLProgramState* glprogramstate = GLProgramState::getOrCreateWithGLProgram(glprogram);
// attach the ProgramState to a Node sprite->setGLProgramState( glprogramstate ); [/code]
The next thing to do is to add custom uniforms and/or attributes using the GLProgramState API.
Adding custom uniforms:
[code language=“cpp”] // setting a float glprogramstate->setUniformFloat(“u_name_1”, 0.15f);
// setting a vec2 glprogramstate->setUniformVec2(“u_name_2”, Vec2(0.2, 0.3));
// setting a callback glprogramstate->setUniformCallback(“uniform_name_2”, [](GLProgram* program, Uniform* uniform){ glUniform4fv( uniform->location, 10, _buffer); }); [/code]
And the same is true for attributes:
[code language=“cpp”] // setting an attribute pointer glprogramstate->setVertexAttribPointer(“a_position”, 2, GL_FLOAT, GL_FALSE, 0, _particleSystem->GetPositionBuffer());
// setting a callback glprogramstate->setVertexAttribCallback(“a_color”, [](VertexAttrib* vertexAttrib) { glVertexAttrib4f(vertexAttrib->index, 0.2, 0.8, 0.7, 1.0); }); [/code]
Download and running the sample
Clone the cocos2d-x-samples repo and follow its instructions. Then launch the “LiquidFun - EyeCandy” demo.
… and follow instructions from the site. And then launch it: